Add Hidden Fields: ClickFunnels Forms
This guide walks you through how to build ClickFunnels forms, pass hidden field data like UTM parameters for campaign tracking, sync submissions with CRM or email platforms, and embed/publish your forms within funnels or externally.
Step 1: What is ClickFunnels?
ClickFunnels is a sales funnel builder used widely by marketers, coaches, course creators, and eCommerce sellers. It provides A/B testing, automation, upsells/downsells, and checkout forms. Forms are input elements embedded inside funnel pages and optimized for conversion.
Step 2: Where Are Forms Created in ClickFunnels?
- Login to ClickFunnels.
- Go to Funnels → Create New Funnel.
- Choose a goal (e.g., Collect Emails, Sell Product, Host Webinar).
- Select a funnel step (e.g., Opt-In or Order).
- Click Edit Page to launch the page editor.
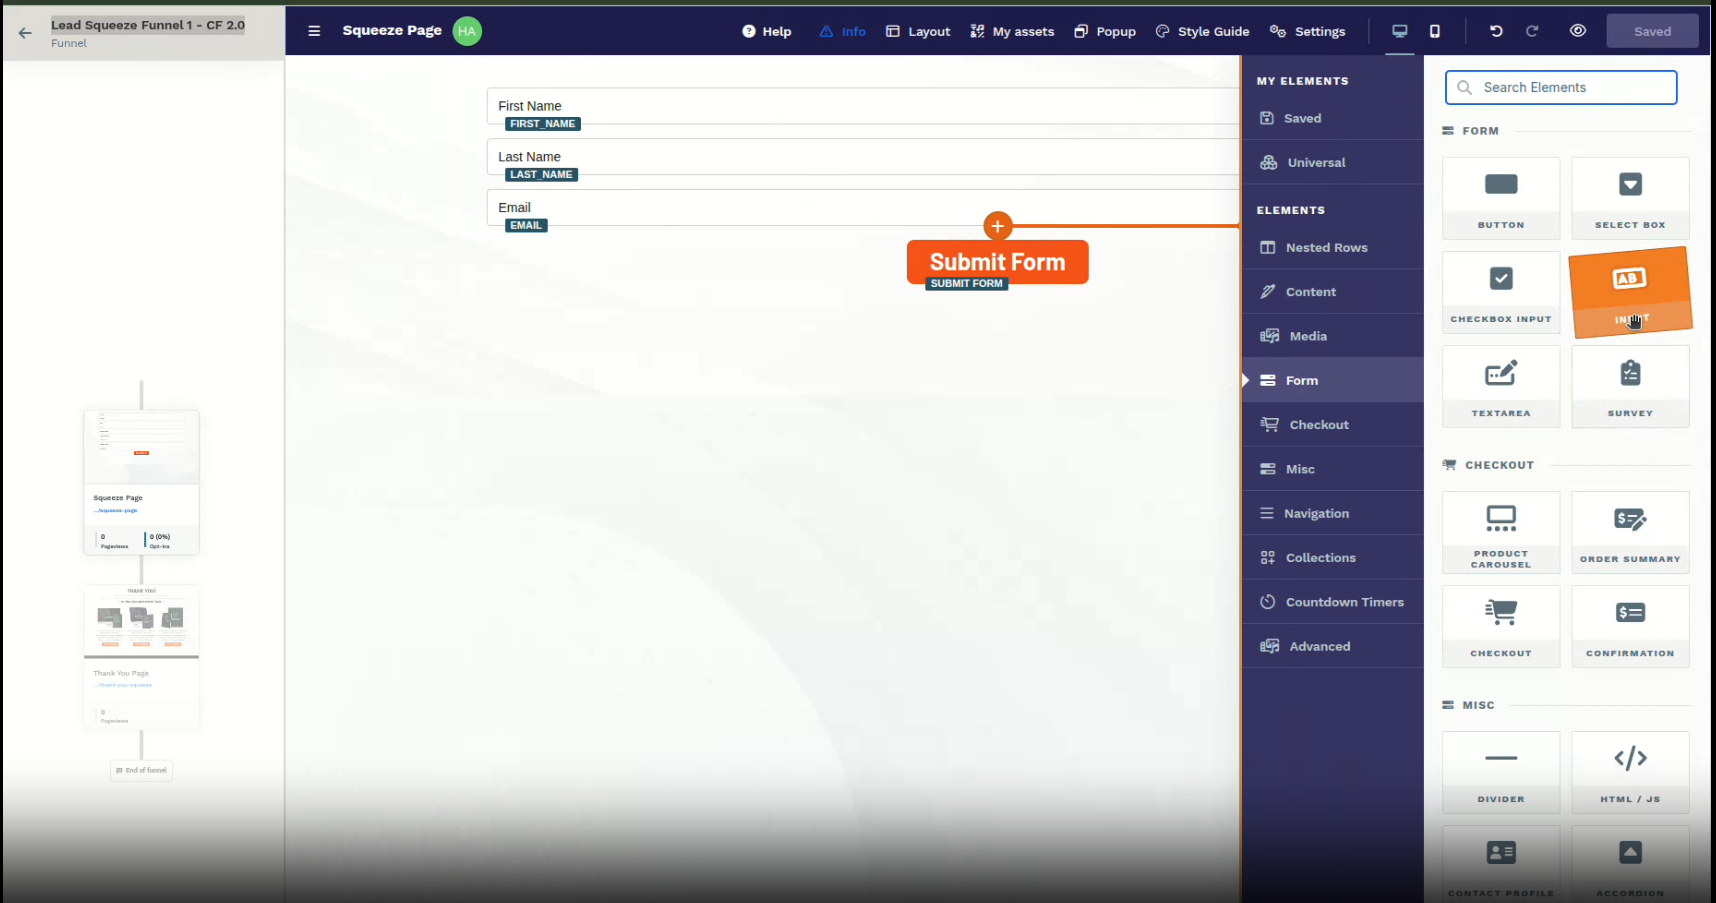
- Drag a Form element (Input + Button) onto the page.
Step 3: How to Create a ClickFunnels Form
- In the editor, drag and drop Input fields onto your funnel page.
- For each field, choose a field type (Name, Email, Phone, or Custom Type), set placeholders, and mark as Required if needed.
- Add a Submit Button to complete the setup. Inputs pass data when a user clicks the button.
Step 4: How to Add Hidden Fields in ClickFunnels
Hidden fields let you pass metadata like channel, channeldrilldown1, channeldrilldown2, channeldrilldown3, channeldrilldown4, landing_page, landing_page_group for analytics and CRM segmentation.
Step-by-Step (Hidden Fields via URL Parameters)
- Add a new Input field to your funnel form using ADD ELEMENT.

- From the right sidebar, drag and drop a Text Element onto the form.
- Click the newly added element to open its properties sidebar.
- By default, ClickFunnels sets the input type to Email and marks it as Required.
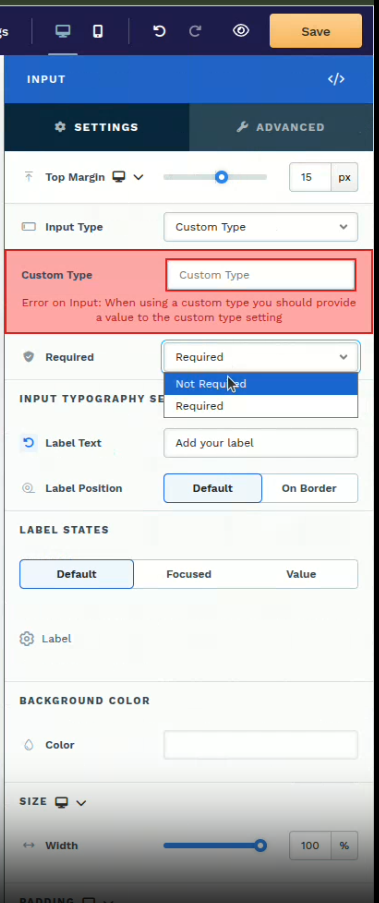
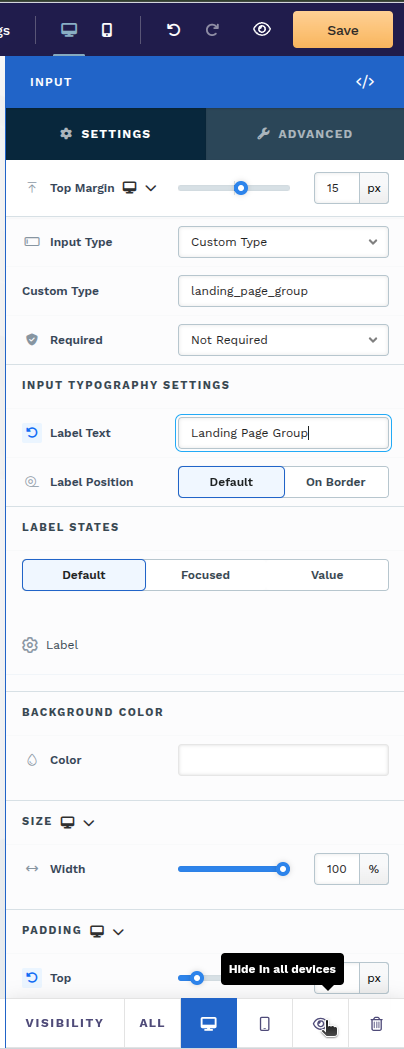
- Change the Input Type to Custom Type.
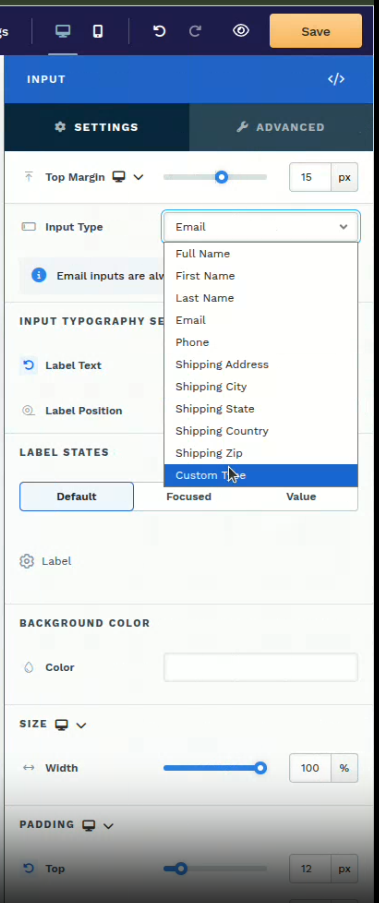
- Enter a Custom Type / Custom Name (e.g.,
landing_page_group) in the input field.
- Set Required to Not Required.
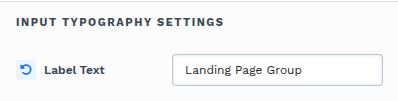
- Provide a Label Text such as Landing Page Group.
- Click the Eye icon at the bottom of the sidebar to hide this input from the form.
- Repeat the steps above to add additional hidden fields like:
channel,channeldrilldown1,channeldrilldown2,channeldrilldown3,channeldrilldown4,landing_page. - ClickFunnels will automatically populate these hidden fields with values from the URL query parameters when the names match their Custom Type.
Pass values via URL
https://yourfunnel.clickfunnels.com/optin?channel=googleIf your hidden input is named channel and your URL includes ?channel=google, the value google will be captured.
Video: Step-by-step walkthrough
Step 5: Embed Your Form as an iFrame
To embed your form externally, use an <iframe> tag:
Basic iFrame Example
<iframe
  src="https://form.com"
  width="100%"
  height="400"
  frameborder="0">
</iframe>
Enable Attry Tracking
Add data-attry-iframe to allow Attry to populate and track hidden fields inside the iFrame:
<iframe
  src="https://form.com"
  data-attry-iframe
  width="100%"
  height="400"
  frameborder="0">
</iframe>
Step 6: CRM & Email Marketing Integrations
ClickFunnels integrates with many CRMs and email tools:
- ActiveCampaign
- HubSpot
- Mailchimp
- Keap (Infusionsoft)
- Salesforce (via Zapier or third-party)
- ConvertKit
- GetResponse
How to Integrate
- In your funnel editor, go to Settings → Integrations.
- Select the integration type (e.g., ActiveCampaign) and connect your account.
- Set the Action (e.g., Add to List, Tag).
- Match form fields to your CRM/email fields and save.
Once integrated, each submission is automatically pushed to your email/CRM platform.
Step 7: Add Attry Code To Your Site
How To Add Code To Your Site
Option 1: Using the WP Admin (no code editor)
- Log into WordPress Admin.
- Go to Appearance → Theme File Editor (or Appearance → Editor if block theme).
- Open
header.php. - Paste the Attry script before the closing
</head>tag. - Save changes.
Important
The Attry code shown below is an example only. Your unique snippet must be copied from your Attry Dashboard and added to your site. Do not use the example script verbatim.
Example <head> block
<head>
  <!-- Attry Main Script -->
  <script src="https://cdn.attry.app/cdn/snippet/v1.js"></script>

  <!-- Attry iFrame Adapter -->
  <script src="https://cdn.attry.app/cdn/adapters/iframe-prefill/v1.js"></script>

  <!-- Configure Attry -->
  <script>
    window.Attry.setConfig({
      debug: true, // set to false in production
      iframeTagging: {
        enabled: true,
        paramMap: {
          channel: "channel",
          channeldrilldown1: "channeldrilldown1",
          channeldrilldown2: "channeldrilldown2",
          channeldrilldown3: "channeldrilldown3",
          channeldrilldown4: "channeldrilldown4",
          landing_page: "landing_page",
          landing_page_group: "landing_page_group"
        },
        preserveExisting: false
      }
    });
  </script>
</head>